티스토리 뷰
Redux

redux는 인기있었던 전역 상태관리 라이브러리이다.
Redux
리덕스 리덕스는 상태(State)를 관리 라이브러리이다. 상태(State) 란? 컴포넌트 내 mutable 데이터 저장소이다. mutable하다는 의미는 상태값을 변경할 수 있다는 것이고 뷰(render)에서 상태를 이용하고,
kmj24.tistory.com
redux의 주요 규칙을 다시 짚어보자
1. Action
상태에 변화가 필요할 때 action을 발생시켜서 redux에 dispatch
2. Reducer
상태를 변화시키는 함수
reducer는 순수함수이며, state, action 2가지 파라미터를 가지도록 한다.
순수함수
- 이전 상태를 변경하지 않고, 새로운 상태 객체를 만들어 반환 (외부의 상태를 변경하지 않아야 한다.)
- 동일한 parameter로 호출된 reducer는 항상 같은 결과를 반환하여야 한다. (input에 대한 output은 항상 같아야 한다.)
3. Store
- 현재의 state, reducer와 내장함수가 포함되어 있다.
- subscribe를 호출할 때 parameter로 특정함수를 넣어준다면, action이 dispatch될 때 마다 그 함수를 실행시킨다.
즉 store가 업데이트 될때마다 함수를 실행한다.
직접 만들기
간단한 redux를 직접 만들어보자.
count라는 상태를 가지며, dispatch할때마다 count를 증가시켜보자.
증가, 감소, 리셋버튼이 있으며
p태그 내 counter 결과가 출력되도록 한다.
최초 count 상태는 0이다
index.html
<!DOCTYPE html>
<html lang="en">
  <head>
    <meta charset="UTF-8" />
    <meta http-equiv="X-UA-Compatible" content="IE=edge" />
    <meta name="viewport" content="width=device-width, initial-scale=1.0" />
    <title>Document</title>
  </head>
  <body>
    <p id="counter"></p>
    <div>
      <button id="btn-increase">증가</button>
      <button id="btn-decrease">감소</button>
      <button id="btn-reset">리셋</button>
    </div>
    <script src="index.js" type="module"></script>
  </body>
</html>
먼저 html 구조를 위의 형태로 작성한다.
index.js에 로직을 작성해보자.
const counterDisplay = document.querySelector("#counter");
const btnIncrease = document.querySelector("#btn-increase");
const btnDecrease = document.querySelector("#btn-decrease");
const btnReset = document.querySelector("#btn-reset");

btnIncrease.addEventListener("click", () => {
  // 증가 버튼 클릭
});

btnDecrease.addEventListener("click", () => {
  // 감소 버튼 클릭
});

btnReset.addEventListener("click", () => {
  // 리셋버튼 클릭
});
템플릿을 만들었으니 이제 redux를 구현해보도록 하자.
Redux.js
redux에는 createStore가 필요하다.

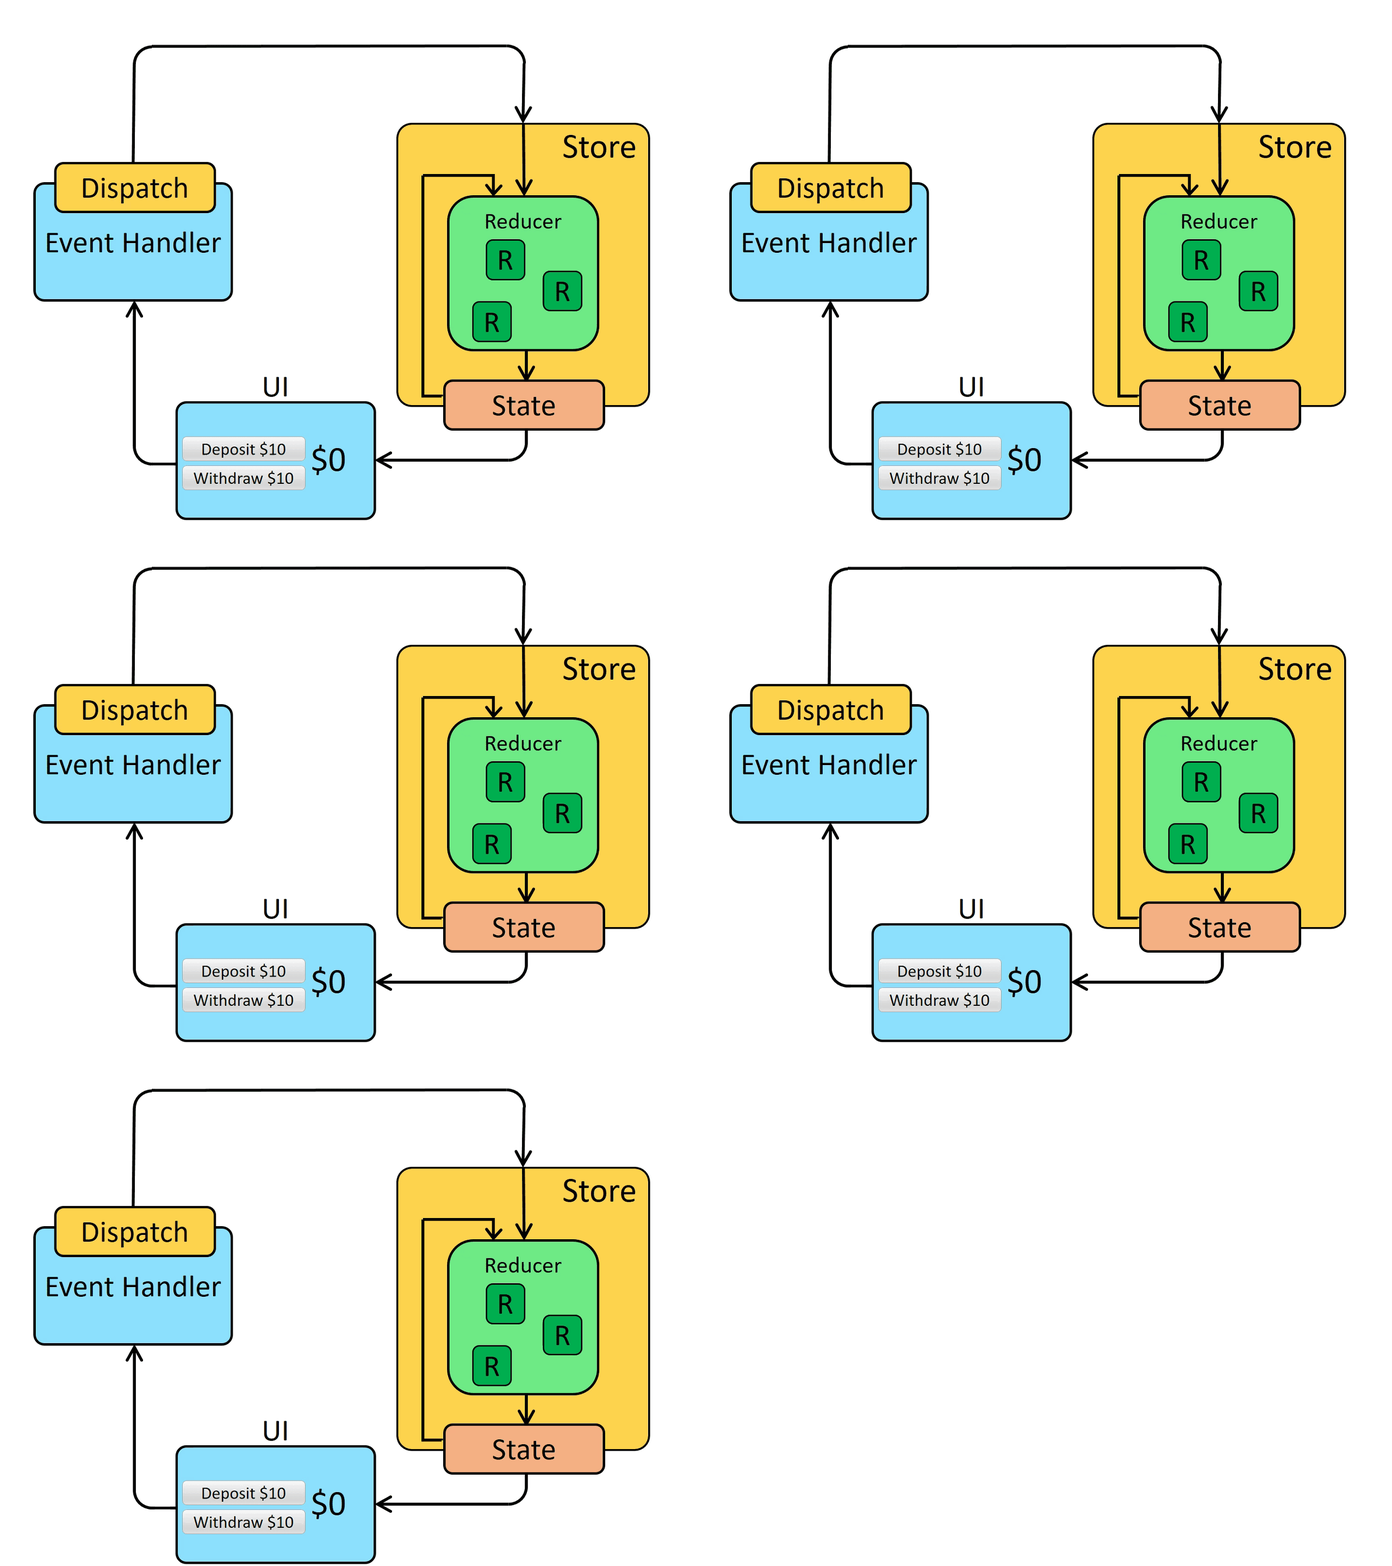
redux는 위와 같은 구조를 지닌다.
store 내부에 state(상태)가 필요한데 closure로 가질 수 있도록 한다.
function createStore(reducer) {
  let state = {};
  let handlers = [];
}
위의 형태가 createStore의 기본 템플릿 형태이다.
reducer를 파라미터로 받아오며, state를 가진다.
이 store의 state를 외부에서 볼 수 있도록 subscribe(구독)를 만든다.
store의 state를 변경하기 위해서 필요한 것은 dispatch이다. 외부에서 발생한 action을 dispatch해주어야 한다.
그리고 store의 state를 외부에서 보여줄 수 있도록 state를 return하는 함수도 필요하다.
위의 조건을 만족시키도록 createStore를 채워보자
먼저 subscribe를 만들어보자. 위에서 언급했듯 subscribe에 parameter로 함수를 넣어준다면 action이 dispatch될 때마다 그 함수를 실행시킨다.
function subscribe(handler) {
  handlers.push(handler);
}
dispatch를 만들어보자.
action을 파라미터로 받아오며, createStore의 reducer에 state와 action을 넣어서 실행시킨 결과를 state로 저장한다.
dispatch 될때마다 subscribe로 받아온 함수를 실행시키도록 한다.
function dispatch(action) {
  state = reducer(state, action);
  handlers.forEach((handler) => handler());
}
여기서 reducer를 사용한 방법은 curring기법이다.
curring
함수의 인자를 분리해서 받고 함수의 재활용, 호출지연 등의 프로그래밍 테크닉을 활용할 수 있음
즉 reducer를 받아둔 후 action을 받아오고 나서 함수를 실행할수 있도록 한것이다,
store의 state를 외부로 전달해주는 getState함수를 만든다.
fucntion getState() {
  return state;
}
여기서는 createStore의 lexical scope를 외부에서 접근할 수 있는 closure기법을 이용한다.
이를 하나의 함수로 만들어보자.
function createStore(reducer) {
  let state = {};
  let handlers = [];

  function dispatch(action) {
    state = reducer(state, action);
    handlers.forEach((handler) => handler());
  }

  function getState() {
    return state;
  }

  function subscribe(handler) {
    handlers.push(handler);
  }

  return {
    dispatch,
    subscribe,
    getState,
  }
}
간단하게 redux의 createStore를 만들어 보았다.
이제 다시 index.js로 돌아가서 이를 활용할 방법을 찾아보자.
먼저 createStore를 호출하기 위해 reducer와 action이 필요하다.
reducer.js
action을 위한 타입, 그리고 초기값을 만들어 보자
// actions
export const INCREASE = "increase";
export const DECREASE = "decrease";
export const RESET = "reset";

// 초기 상태값
const InitializeState = {
  count: 0,
};
증가, 감소, 초기화 3가지 action이 있고, 초기상태값을 만들어둔다.
그리고 action을 기반으로 reducer를 작성해보자.
function reducer(state = InitializeState, action) {
  switch (action.type) {
    case INCREASE:
      if (action.payload) {
        return {
          ...state,
          count: state.count + action.payload,
        };
      }
      return {
        ...state,
        count: state.count + 1,
      };
    case DECREASE:
      return {
        ...state,
        count: state.count - 1,
      };
    case RESET:
      return {
        ...state,
        ...InitializeState,
      };
    case SET_COUNTER:
      return {
        ...state,
        count: action.payload,
      };
    default:
      return { ...state };
  }
}
여기서 action은 { type, payload }로 구성된다.
type은 말그대로 어떤 action인지(type)을 구분하고, payload는 action에 대한 상태에 가할 행동을 넣어준다.
redux에서 action을 dispatch할 때, dispatch(액션(payload))과 같은 형태로 넘겨준다. 이와 같이 만들기 위해 curring기법을 이용하여 쉽게 타입에 대한 action을 만들어둘 수 있다.
const actionCreator = (actionType) => (payload) => ({
  type: actionType,
  payload
})
action creator를 이용하여 action타입에 대한 함수를 만들어 둘 수 있다.
const setCounter = actionCreator(SET_COUNTER);
const increase = actionCreator(INCREASE);
const decrease = actionCreator(DECREASE);
const reset = actionCreator(RESET);
index.js
redux 스토어를 호출하고, 이를 subscribe한다.
그리고 dispatch될때마다 p태그 내부에 count 상태를 보여지게 하도록 한다.
iumport reducer from './reducer';

const store = createStore(reducer);

store.subscribe(function () => {
  const { count } = store.getState();
  counterDisplay.textContent = count;
});
이제 버튼을 누를때 마다 action을 dispatch하여 redux store의 상태를 변화시킬 수 있다.
const dispatch = store.dispatch;

dispatch(setCounter(0));

btnReset.addEventListener("click", () => {
  dispatch(reset());
});

btnIncrease.addEventListener("click", () => {
  dispatch(increase());
});

btnDecrease.addEventListener("click", () => {
  dispatch(decrease());
});
최초의 dispatch로 counter를 세팅하는 setCounter를 호출하며 payload로 0을 넣어준다.
그리고 각 버튼에 대한 action을 dispatch하도록 한다.
여기서는 간단하게 redux의 작동 원리에 대하여 알아보는 것으로 하나의 상태에 대한 관리를 해주는 로직을 작성했지만, 여러가지 상태를 가지고, 비동기처리를 해주는 미들웨어 등을 적용하기 위해 좀더 복잡한 로직이 필요하다.
'front-end > react' 카테고리의 다른 글
| 가상 돔, Virtual DOM (0) | 2023.05.03 |
|---|---|
| React useState, useEffect Mechanism(with. closure) (0) | 2023.05.03 |
| React Diffing algorithm2 - Fiber (0) | 2021.12.27 |
| React Diffing algorithm1 - Heuristics algorithm (0) | 2021.12.13 |
| Next.js 맛보기 (0) | 2021.08.02 |
